ZIGChain Bridge
TL;DR: The ZIGChain Bridge moves ZIG, USDC, and other supported tokens between ZIGChain and partner networks in a few clicks. Connect a wallet, pick tokens and networks, review fees, and approve one transaction.
Overview
The ZIGChain Bridge on ZIGChain Hub helps you move assets across chains quickly, at low cost, and with strong security. You can transfer ZIG, USDC, and other supported tokens between ZIGChain and multiple networks without leaving the Hub dashboard. The ZIGChain Bridge combines routing, optional DEX swaps, and settlement into a single approval flow.
This guide walks through the ZIGChain Bridge layout, automated routing, slippage settings, and each step from wallet connect to completion. You will see how the central panel, routing summary, and settings work before you submit a transfer. The step sections mirror the live ZIGChain Bridge interface so you can follow along on ZIGChain Hub.
Key Concepts
- Cross-chain transfer: Moving tokens between ZIGChain and partner networks through a single Hub approval flow.
- Routing: The automated path that may bridge, swap on a DEX, and deliver tokens to your destination wallet in one flow.
- Max slippage: The highest price change you accept between the quoted receive amount and the amount settled on chain.
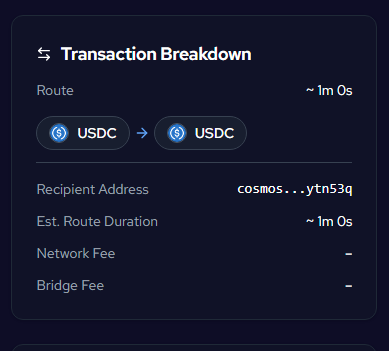
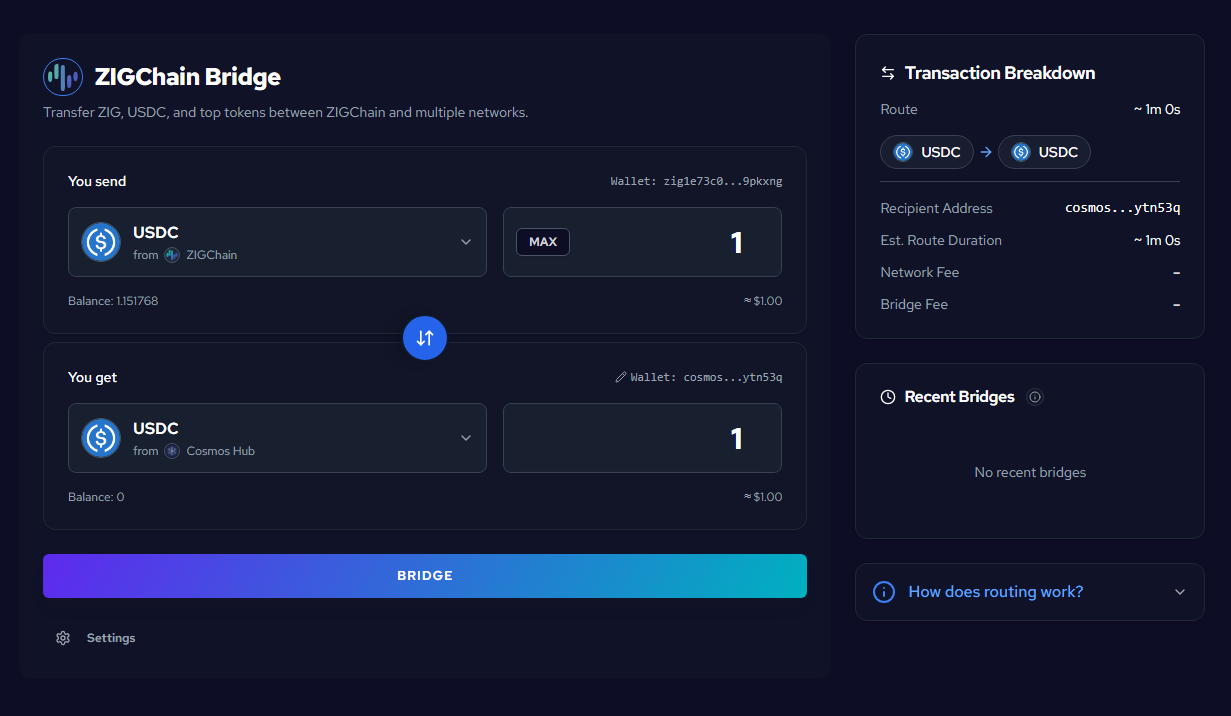
- Transaction breakdown: The right-panel summary of route, recipient, estimated duration, and fees before you sign.
ZIGChain Bridge Interface
The ZIGChain Bridge interface groups controls into three areas that work together during every transfer. The central panel handles token and amount selection, the right panel explains routing and lists recent activity, and settings at the bottom control slippage tolerance. Together these areas let you configure, review, and monitor each cross-chain move from one screen.
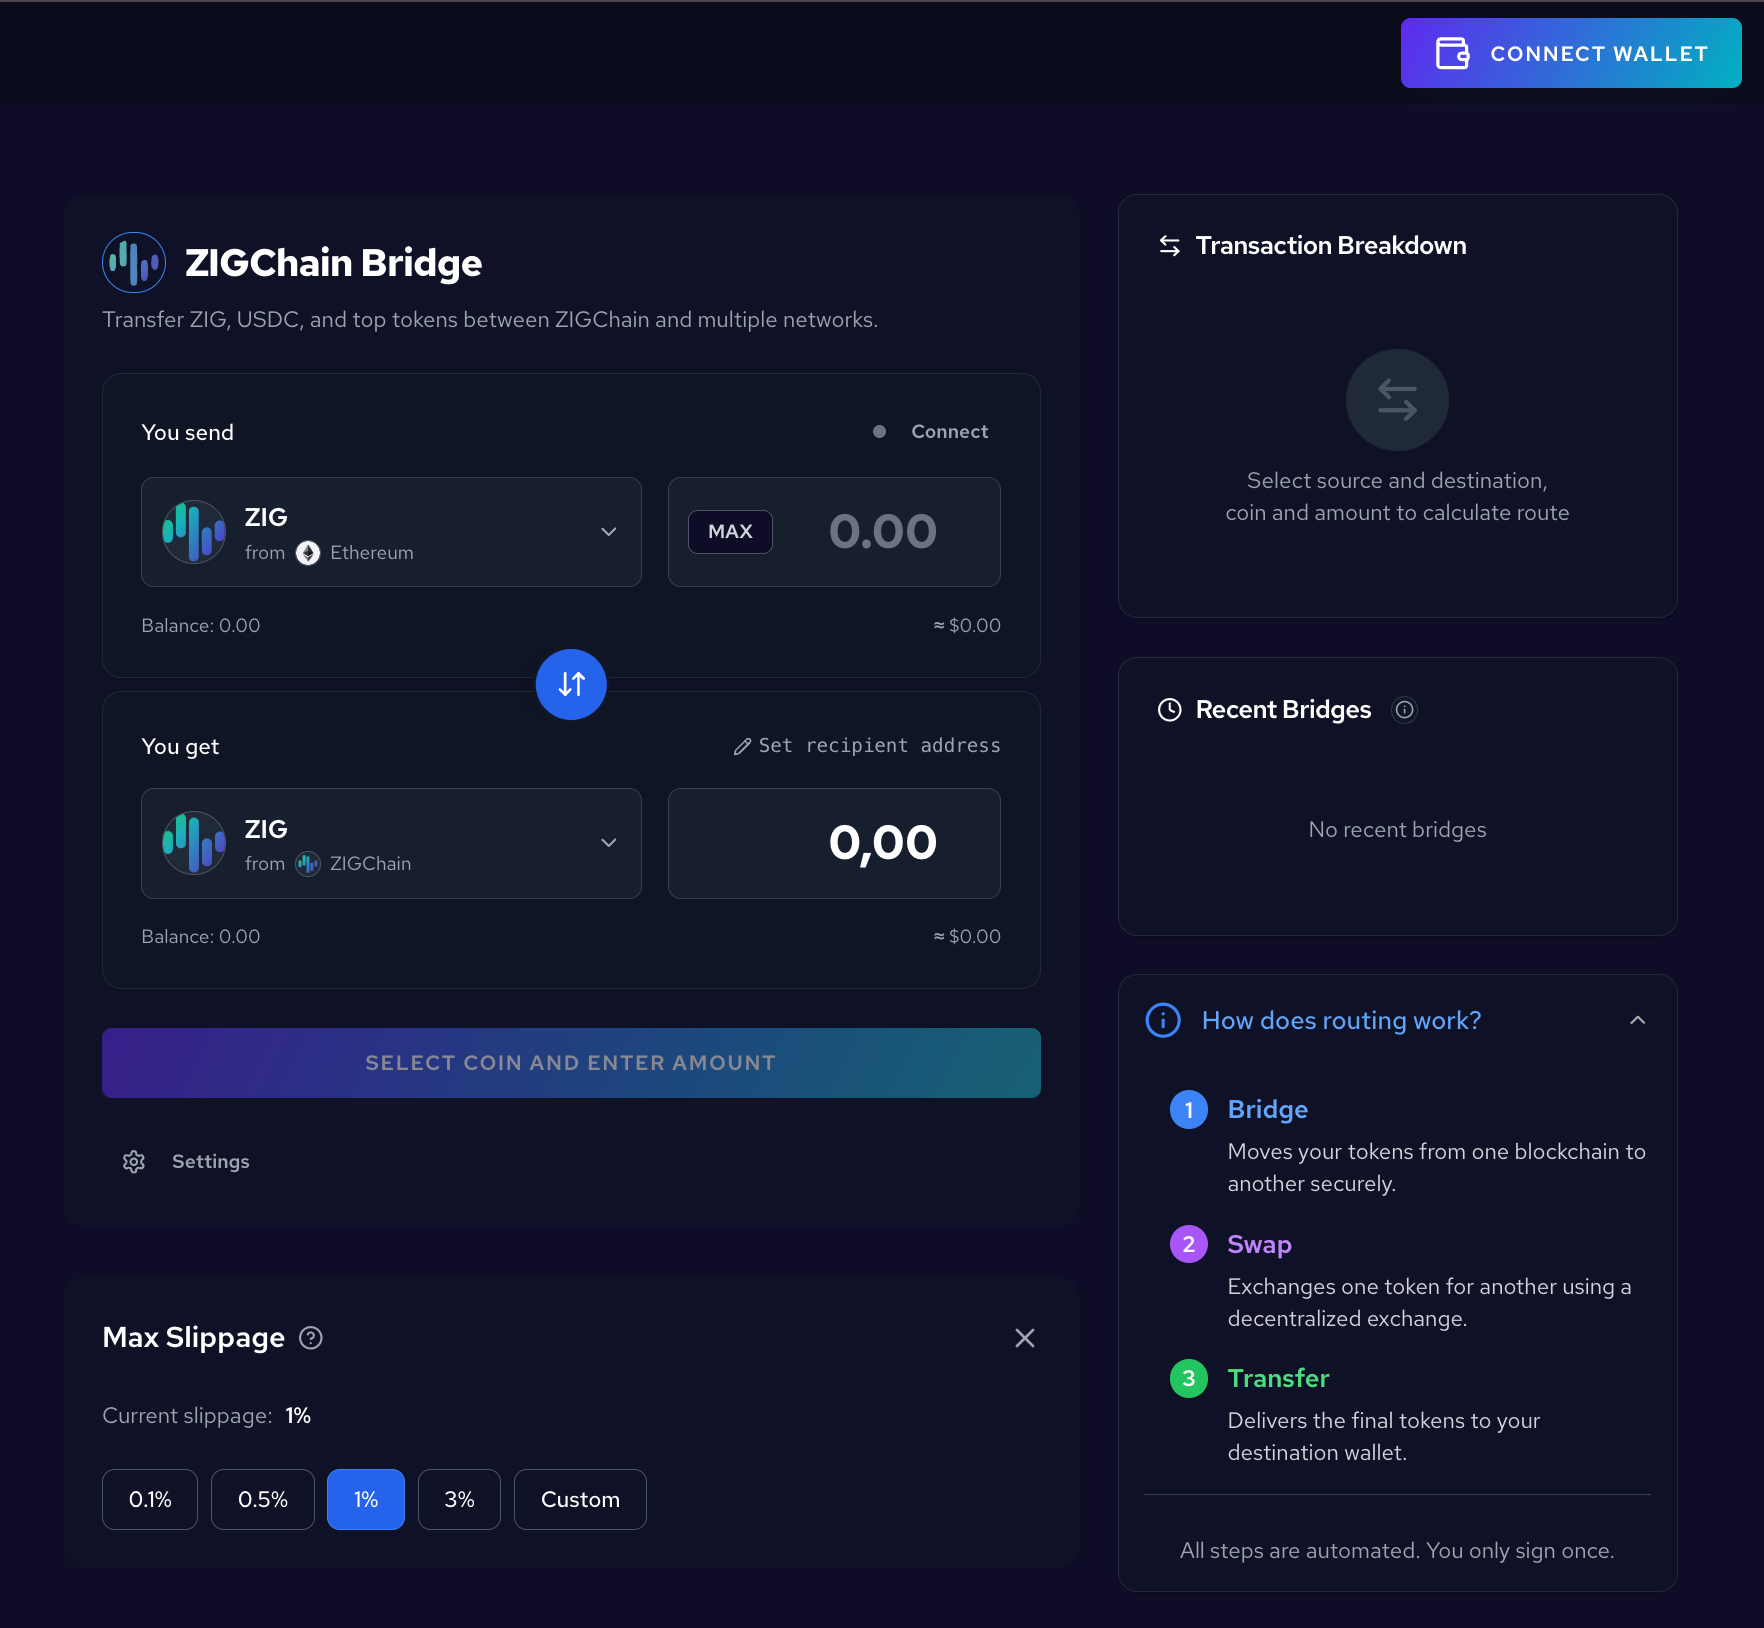
Central Panel
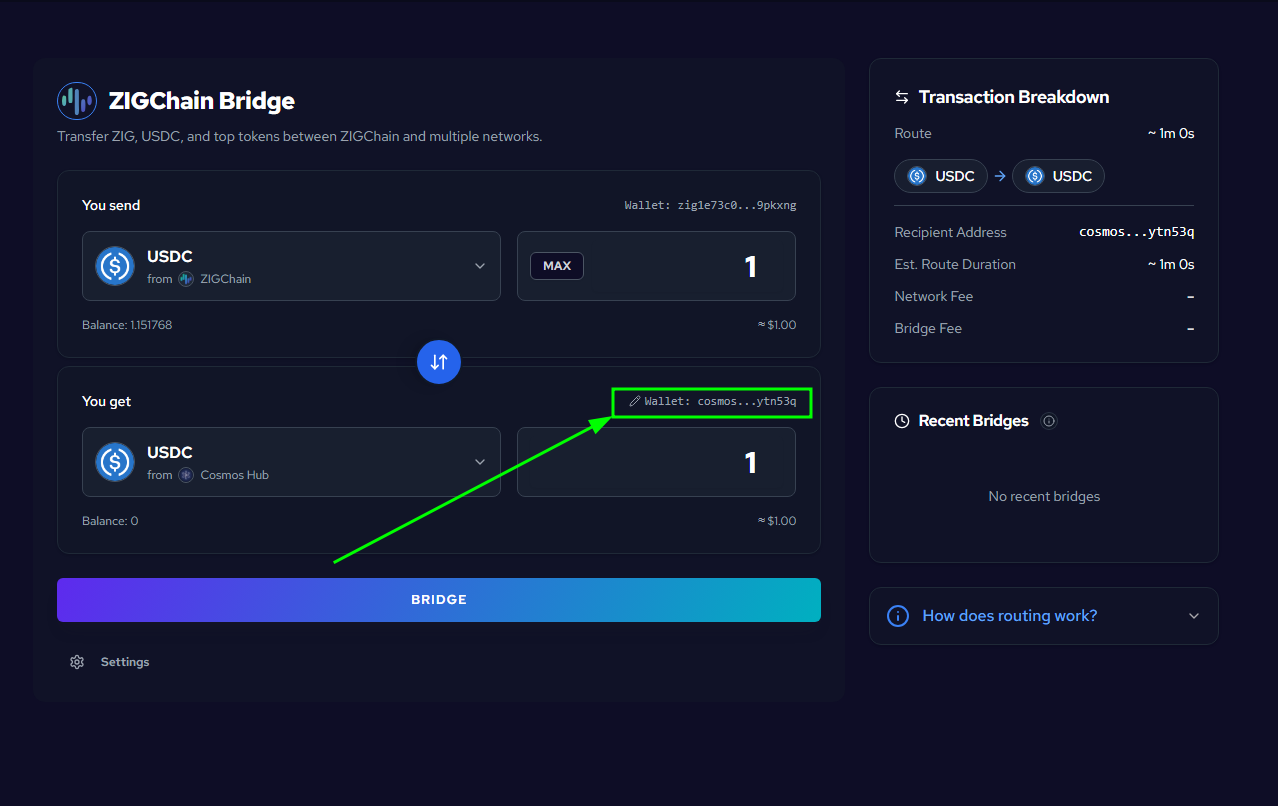
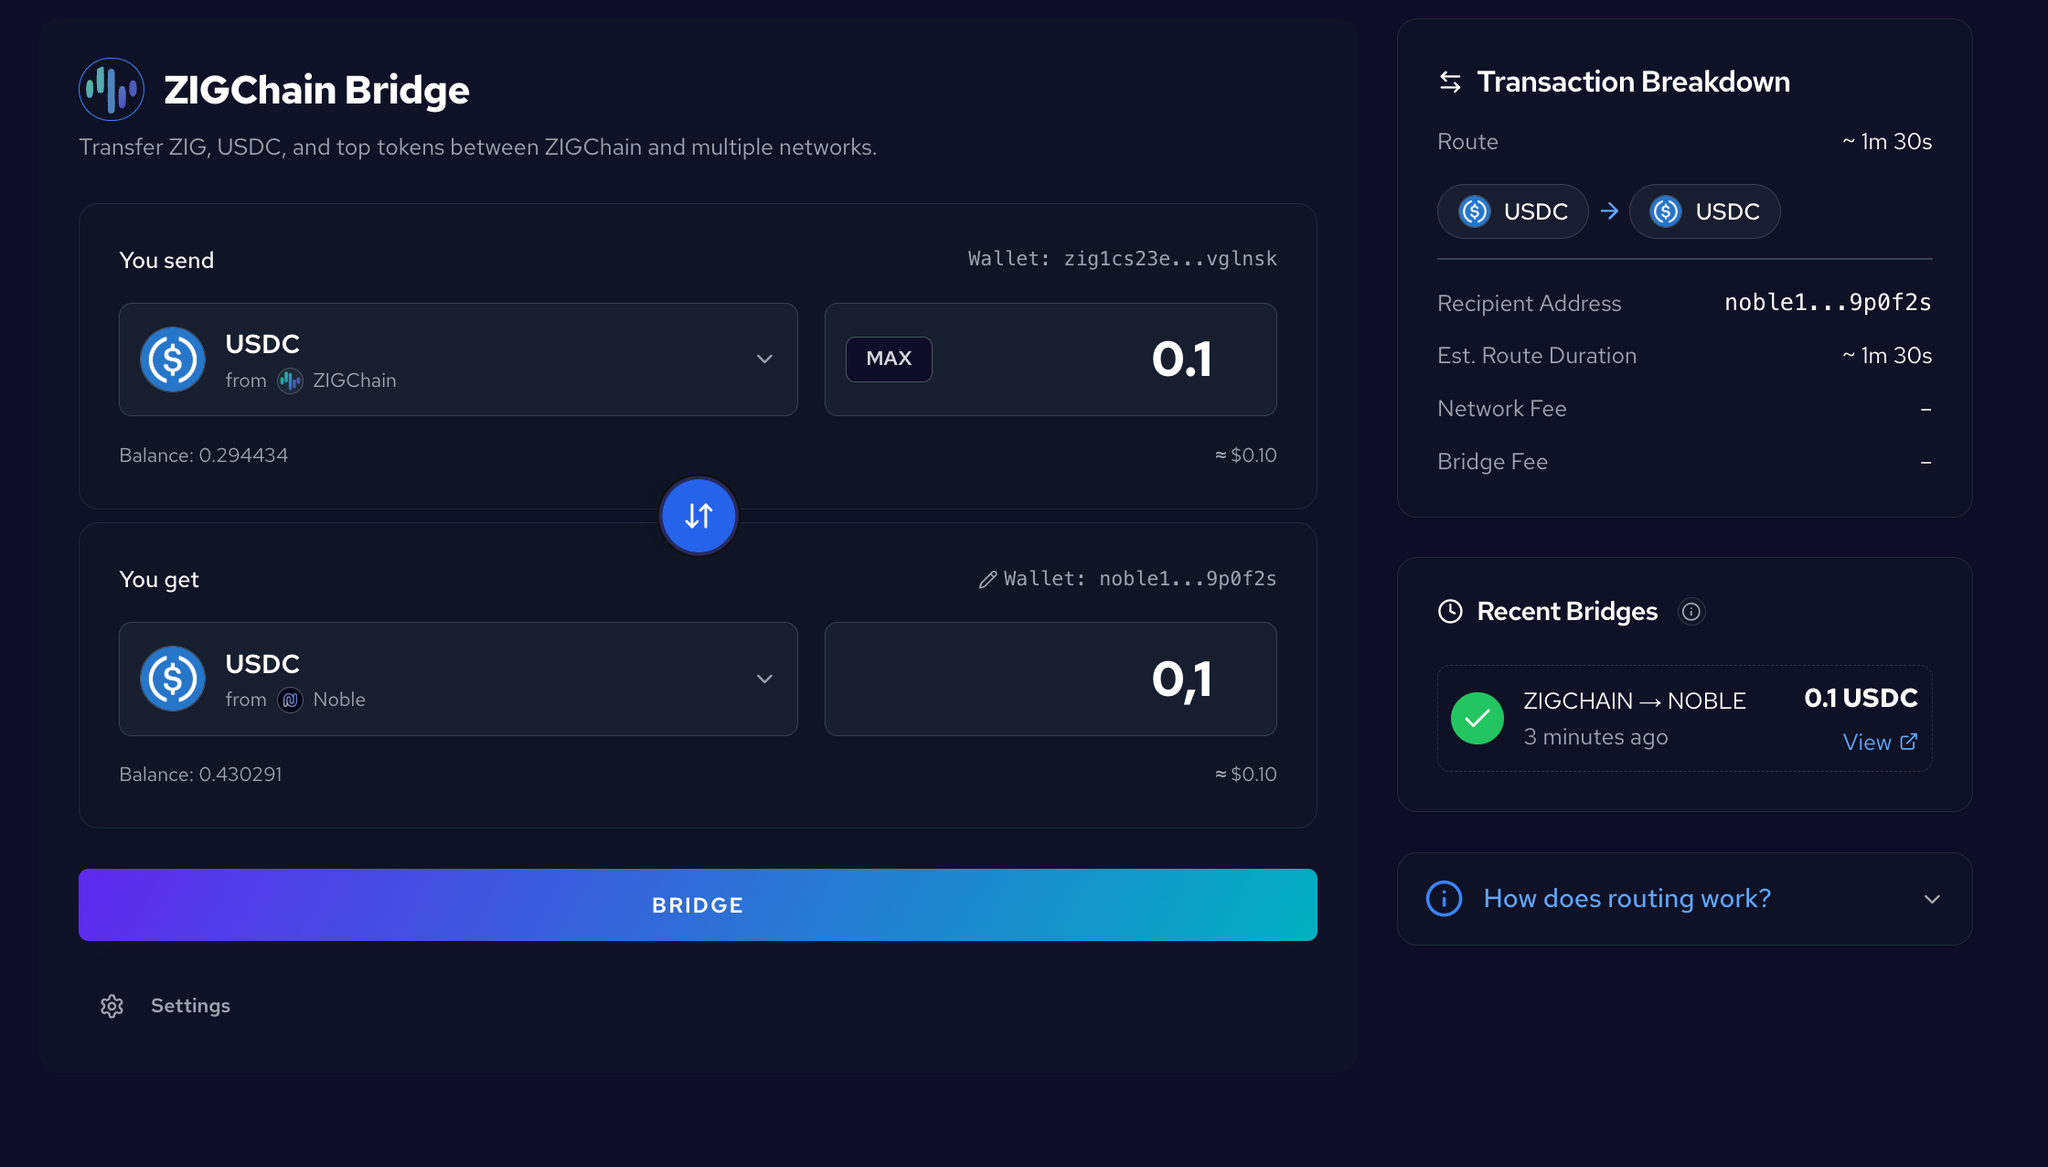
The central panel is where you configure both sides of the ZIGChain Bridge transfer. Use it to pick assets, networks, and amounts before you sign the transaction. The panel also exposes the swap-direction control and the primary action button once a route is ready.
- You send and You get — Choose the token and network on each side.
- Use the arrow button between them to swap direction.
- Enter an amount or MAX; optionally Set recipient address in You get.
- The main action button is BRIDGE (or SELECT COIN AND ENTER AMOUNT until a route is ready).
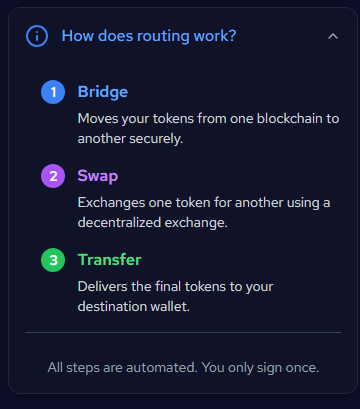
How Routing Works
Routing shows how the ZIGChain Bridge will move your tokens behind the scenes. Expand the panel when you want to confirm whether a swap step is included before you commit funds. The summary stays visible while you adjust amounts or slippage on the main panel.
In the right panel, expand How does routing work? to see the three automated steps.
- Bridge — Moves your tokens between chains.
- Swap — Exchanges via a DEX if needed.
- Transfer — Delivers to your destination wallet.
You only sign once.
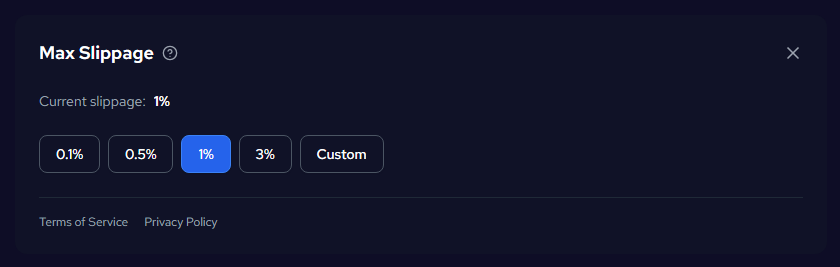
Settings
Open Settings at the bottom of the bridge panel to set Max Slippage (0.1%, 0.5%, 1%, 3%, or Custom). Slippage is how much the received amount can change if prices move between when you submit and when the transfer settles; Max Slippage caps that movement and sets the minimum you are willing to accept. Review it before large or time-sensitive transfers—you can reopen Settings anytime before clicking BRIDGE.
Connect Wallet and Select Tokens
These steps cover wallet connection and token selection on both sides of the ZIGChain Bridge. Complete them before you enter an amount or review fees on the transaction breakdown. Each step maps to a control in the central panel of the ZIGChain Bridge.
Click Connect Wallet
On the main ZIGChain Bridge interface, click the CONNECT WALLET button in the top right corner. The button stays visible until a supported wallet is linked to the session. Once connected, your balances populate the token pickers on both sides of the form.
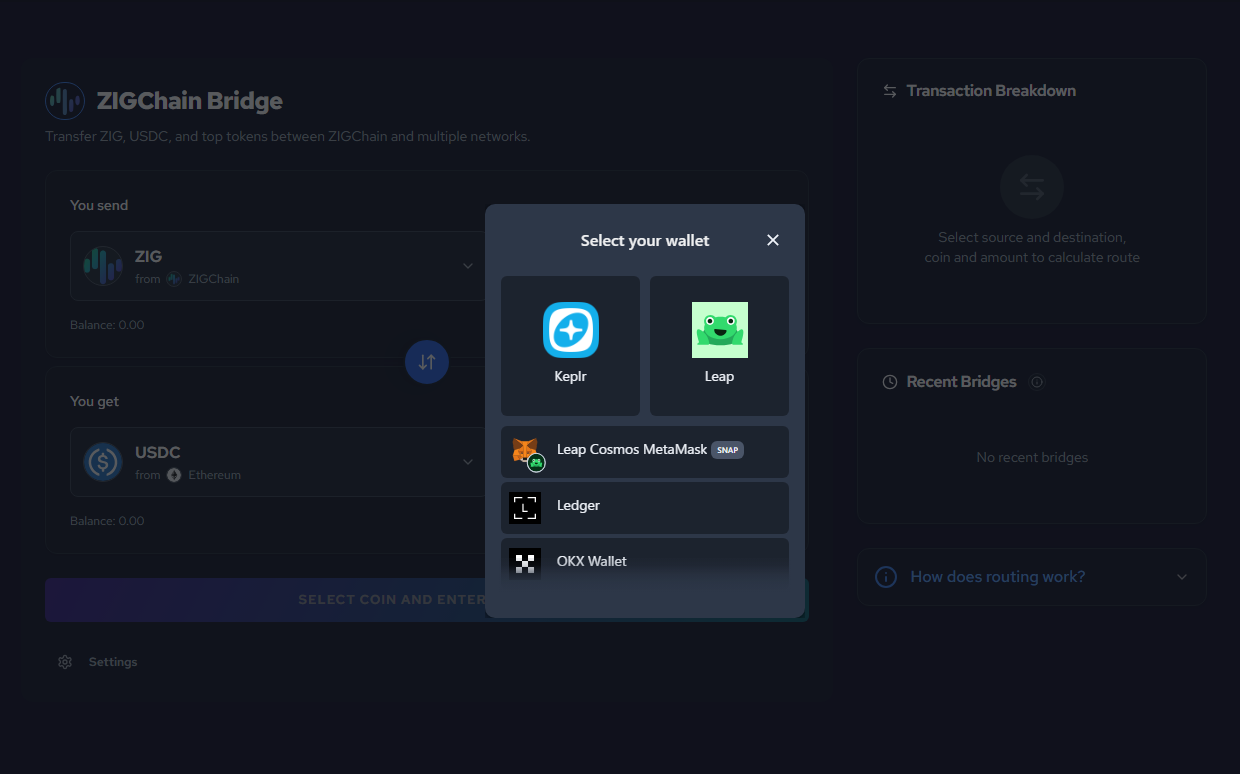
Select Your Wallet Provider
A modal appears with wallet options when you start a ZIGChain Bridge session. Choose your wallet (e.g. Keplr) and follow the prompts to connect. Your balance will show once connected and you can proceed to token selection.
Select the Token You Want to Bridge
In the You send section, click the token dropdown to open the asset list on the ZIGChain Bridge. Search or browse, then pick the token you want to send. When you select a token, choose the source network (e.g. ZIGChain, Ethereum, Cosmos Hub) from the supported networks list.
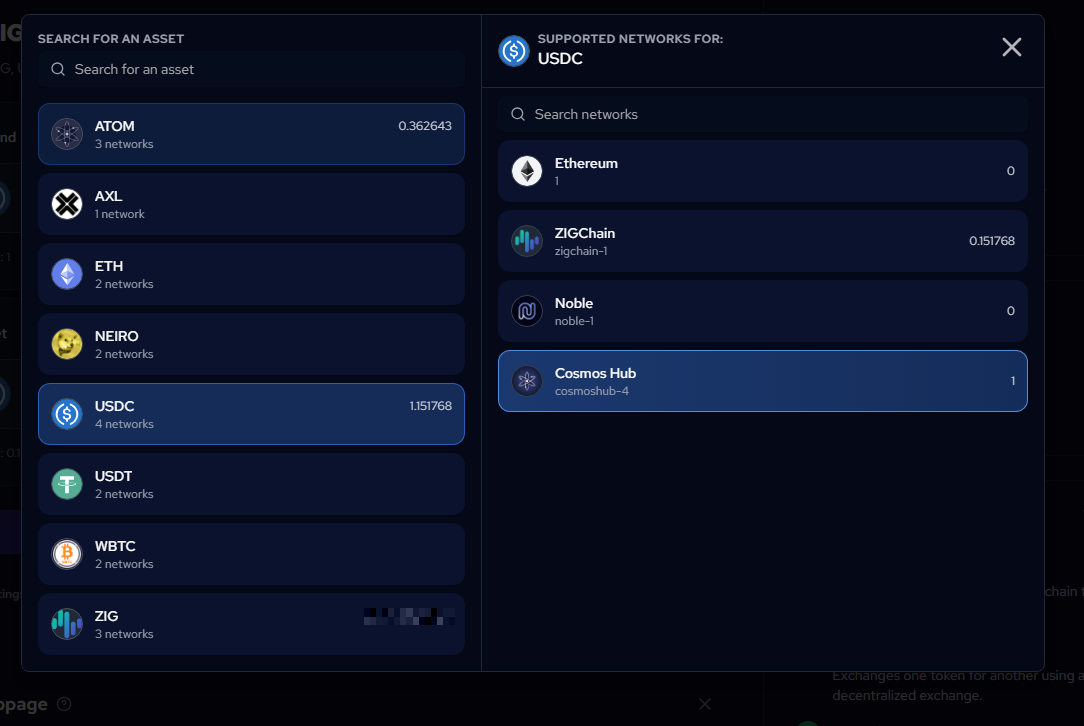
Select the Token You Want to Receive
In the You get section, pick the token and network you want to receive through the ZIGChain Bridge. Use the same flow: choose the asset, then the destination network. This defines what you will receive on the other side once settlement completes.
Review Amount and Start the Bridge
After tokens and networks are set on the ZIGChain Bridge, enter an amount, confirm the breakdown, and approve the transaction in your wallet. The right panel shows route, timing, and fee details while you edit the form.
Enter Amount and Click Bridge
Enter the amount you want to bridge in the You send field, or click MAX to use your full balance on the ZIGChain Bridge. The You get side will show the estimated amount you'll receive after routing and any swap step. Review both sides before you continue.
On the right, check the Transaction Breakdown for route, recipient, duration, and fees. The breakdown updates when you change tokens, networks, or slippage on the ZIGChain Bridge.
You can change the wallet address that will receive the funds on the ZIGChain Bridge. Click the Wallet field in the You get section (next to the pencil icon) to set or edit the destination address. Confirm the address before you sign because on-chain settlement cannot be reversed from the Hub.
You can open Settings and set Max Slippage (0.1%, 0.5%, 1%, 3%, or Custom) if you want to control how much price movement you accept on the ZIGChain Bridge. When everything looks correct, click the BRIDGE button to start the process.
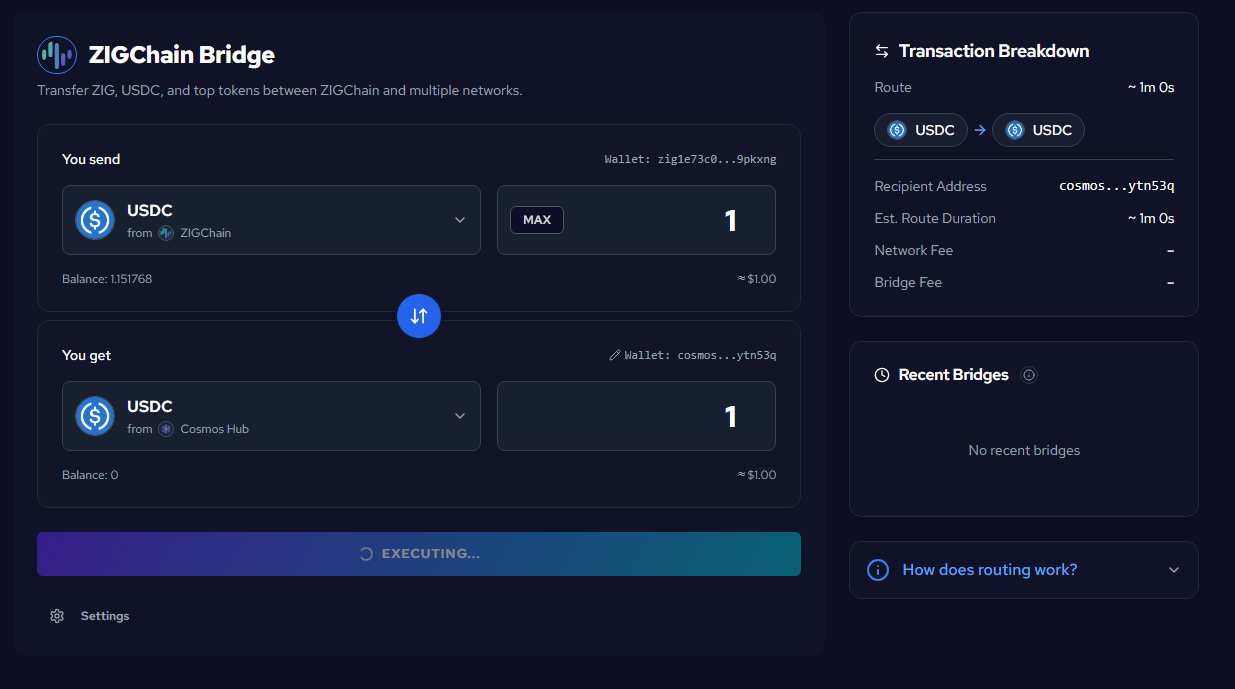
Transfer in Progress
After you click BRIDGE on the ZIGChain Bridge, the button changes to EXECUTING... with a loading spinner while the transfer is in progress. Leave the page open so Recent Bridges can refresh status for the active route.
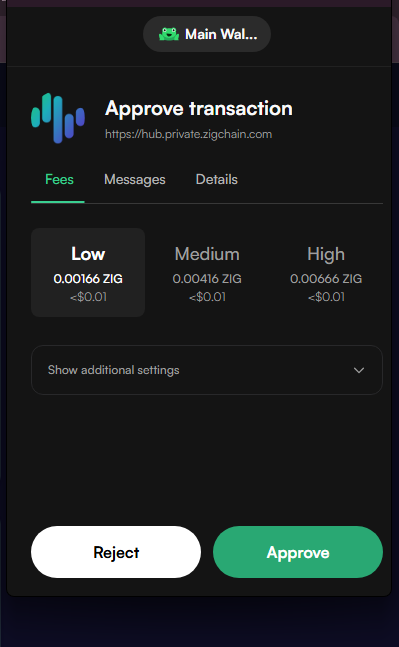
Approve the Transfer in Your Wallet App
Your wallet app will ask you to approve the ZIGChain Bridge transaction. Review the request for fees and destination, choose a fee level (Low, Medium, or High) if shown, then tap Approve to confirm. Use Reject to cancel and return to the form without moving funds.
Track Transfer and Complete
Use Recent Bridges on the right panel to follow progress and confirm settlement. Status updates appear without reloading the Hub.
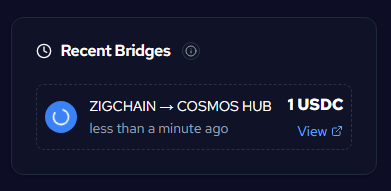
Monitor Transfer in Recent Bridges
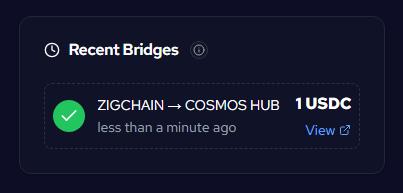
Once the ZIGChain Bridge transaction is initiated, check the Recent Bridges section on the right. Your transfer will appear with the route (e.g. ZIGCHAIN → COSMOS HUB), the amount, and a loading indicator. Use View to see more details while execution continues.
Confirm Completion
When the ZIGChain Bridge finishes, the same entry in Recent Bridges will show a green checkmark. Your tokens have been bridged successfully and the destination wallet should reflect the received balance after settlement.
🎉 You've successfully bridged your assets using ZIGChain Hub!
Start Another Transfer
After a transfer finishes—or while one is still executing—you can queue the next move from the central panel. Select the token and network on each side, then enter an amount. The BRIDGE button stays hidden until you enter a new amount; once it reappears, review the breakdown and click BRIDGE to start the next transfer.
Common Questions
Can I send bridged tokens to a different wallet?
Yes. In You get, click the Wallet field next to the pencil icon and set or edit the destination address before you click BRIDGE. The destination can differ from the wallet you connected on the ZIGChain Bridge. Double-check the address format matches the destination network to avoid failed settlement.
How do I adjust max slippage on the ZIGChain Bridge?
Open Settings and pick 0.1%, 0.5%, 1%, 3%, or a custom value. Max slippage caps how much the received amount can change between the estimate and settlement. Raise it for volatile pairs or tight timing; lower it when you want a stricter minimum receive amount.
What happens when routing includes a swap?
Some token pairs on the ZIGChain Bridge need a DEX swap between chains. When that happens, the right panel lists Bridge, Swap, and Transfer under How does routing work? You still approve the full flow once in your wallet—even when all three steps appear.